
Frequently Ask Questions
Looking for something specific? Search across the entire site.
Most Popular Questions
Press the dial ** + desired extension (for example **1002) Then press the B TRANSFER key. By doing this, the caller should hear a voicemail prompt and should be able to leave a voicemail.
Once telephone services have been activated, this document will assist in setting up your mobile application.
Note to client:
On behalf of Future Digital 360 we thank you for your trust and business. We are always doing our best to provide you with the most advanced technology resources available. When you are ready to install this app please cut and paste the below message in yellow and email it to Support@FutureDigital360.com. You will receive a response back with a link, please follow steps 1 through 4 below.
Email to: support@futuredigital360.com
FD360 Support,
I am ready to install the Linkus mobile app you have provided to me, please email me the QR link so I can get started. I understand upon receipt of the email I will only have 30 minutes to install otherwise I will need to request a new QR link.
My email address and telephone extension are as follows:
The steps below are show with an iPHone, if you are using an Android phone the steps will be very similar
1. First download the application from using one of the two links below depending on your smart phone:
Android: Yeastar Linkus Mobile Client - Apps on Google Play
iPhone: Yeastar Linkus Mobile Client on the App Store (apple.com) (2 minutes)
Linkus is a VoIP Mobile Client coordinated with Yeastar S-Series VoIP PBX that makes your iOS mobile phone an office extension and links you and your customers anywhere anytime. Make and receive calls through corporate phone network to slash call costs and enhance efficiency with consistent in-office experience.
2. From your mobile phone click the App Store and search for Yeastar, click to download.
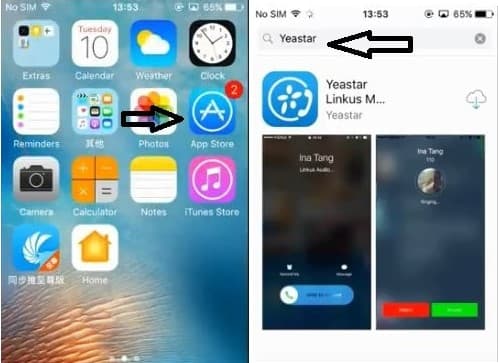
3. Launch the App after download. On your first launch you will be prompted whether to allow Linkus to access your data and your contacts, click Allow & continue.
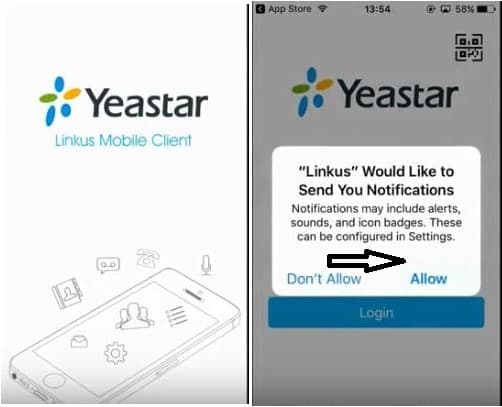
4.You are ready to check you email and scan the QR code.
Open the email sent from FutureDigital360
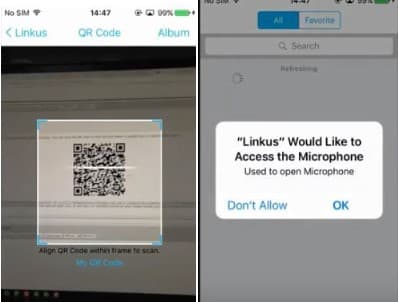
Click the QR code on the Yeastar app, it will ask to access the camera on the mobile phone, select OK.
5. Scan the QR Code that is open on your computer monitor from the email, once scanned you will get the message the Linkus would like to access the Microphone, select OK.
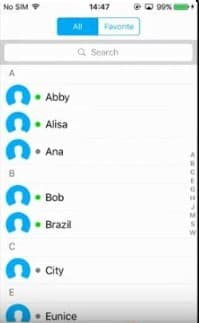
6. You are now ready to use this mobile app feature. Thank you for your valued business and trust. Future Digital 360
This app provided by FD360 is ready to use, some of the key capabilities are:
Key Capabilities
- Make and receive enterprise VoIP calls over your Wi-Fi or mobile data networks to lower mobile voice charges
- One number reach to conceal your personal mobile phone number and ensure unified corporate identity
- Set up flexible ring strategy for Linkus and the desktop phone
- Select different outbound routes for different destinations (local/long-distance/international, etc.)
- Corporate directory integration with lookup and visual status indicator (available/unavailable/busy)
- Configurable PBX features including Call Transfer, Call Forwarding, Call Waiting, DND, and Ring Timeout
- Support Push Notifications to alert users of incoming calls while conserving energy
Main Features
Call Forwarding
Call History
Call Route Selection
Call Transfer
Call Waiting
Contact Management
Corporate Directory
Do Not Disturb
Extension Status
Hold & Resume
Native Contacts Integration
One Touch Recording
Outbound Route Selection
PUSH Notification
Ring Strategy Selection
Speed Dial/Favorite
Voicemail
Specifications
iOS Requirement: iOS 8.0 or higher
Network: 2G/3G/4G or Wi-Fi
Protocol: SIP FRC2361
Codec: iLBC
Network Protocol: TCP/IP/UDP, RTP/SRTP/RTCP, HTTP/HTTPS
DTMF: Inband, RFC4733 (RFC2833), Info
Important:
This application is integrated with Yeastar S-Series VoIP PBX (http://www.yeastar.com/s-series-voip-pbx)your administrator must provide you with identity information for you to start using.
Note to client:
On behalf of Future Digital 360 we thank you for your trust and business. We are always doing our best to provide you with the most advanced technology resources available. When you are ready to install this app please cut and paste the below message in yellow and email it to Support@FutureDigital360.com. You will receive a response back with a link, please follow steps 1 through 4 below.
Email to: support@futuredigital360.com
FD360 Support,
I am ready to install the Linkus mobile app you have provided to me, please email me the QR link so I can get started. I understand upon receipt of the email I will only have 30 minutes to install otherwise I will need to request a new QR link.
My email address and telephone extension are as follows:
The steps below are show with an iPHone, if you are using an Android phone the steps will be very similar
1. First download the application from using one of the two links below depending on your smart phone:
Android: Yeastar Linkus Mobile Client - Apps on Google Play
iPhone: Yeastar Linkus Mobile Client on the App Store (apple.com) (2 minutes)
Linkus is a VoIP Mobile Client coordinated with Yeastar S-Series VoIP PBX that makes your iOS mobile phone an office extension and links you and your customers anywhere anytime. Make and receive calls through corporate phone network to slash call costs and enhance efficiency with consistent in-office experience.
2. From your mobile phone click the App Store and search for Yeastar, click to download.
3. Launch the App after download. On your first launch you will be prompted whether to allow Linkus to access your data and your contacts, click Allow & continue.
4.You are ready to check you email and scan the QR code.
Open the email sent from FutureDigital360
Click the QR code on the Yeastar app, it will ask to access the camera on the mobile phone, select OK.
5. Scan the QR Code that is open on your computer monitor from the email, once scanned you will get the message the Linkus would like to access the Microphone, select OK.
6. You are now ready to use this mobile app feature. Thank you for your valued business and trust. Future Digital 360
This app provided by FD360 is ready to use, some of the key capabilities are:
Key Capabilities
- Make and receive enterprise VoIP calls over your Wi-Fi or mobile data networks to lower mobile voice charges
- One number reach to conceal your personal mobile phone number and ensure unified corporate identity
- Set up flexible ring strategy for Linkus and the desktop phone
- Select different outbound routes for different destinations (local/long-distance/international, etc.)
- Corporate directory integration with lookup and visual status indicator (available/unavailable/busy)
- Configurable PBX features including Call Transfer, Call Forwarding, Call Waiting, DND, and Ring Timeout
- Support Push Notifications to alert users of incoming calls while conserving energy
Main Features
Call Forwarding
Call History
Call Route Selection
Call Transfer
Call Waiting
Contact Management
Corporate Directory
Do Not Disturb
Extension Status
Hold & Resume
Native Contacts Integration
One Touch Recording
Outbound Route Selection
PUSH Notification
Ring Strategy Selection
Speed Dial/Favorite
Voicemail
Specifications
iOS Requirement: iOS 8.0 or higher
Network: 2G/3G/4G or Wi-Fi
Protocol: SIP FRC2361
Codec: iLBC
Network Protocol: TCP/IP/UDP, RTP/SRTP/RTCP, HTTP/HTTPS
DTMF: Inband, RFC4733 (RFC2833), Info
Important:
This application is integrated with Yeastar S-Series VoIP PBX (http://www.yeastar.com/s-series-voip-pbx)your administrator must provide you with identity information for you to start using.
If you want to remove a user or a scan profile in the SCAN TO NETWORK FOLDER, please follow the steps below:
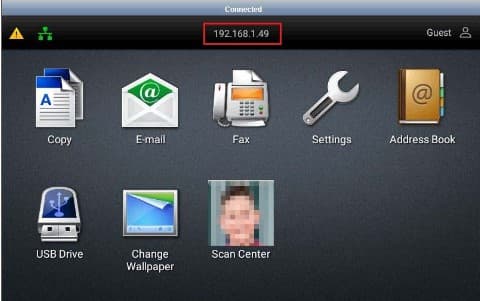
1. Go to your printer panel screen and take note of the IP Address located at the top center part. Note: Your Printer's IP Address should be different from what is shown in the screenshot.
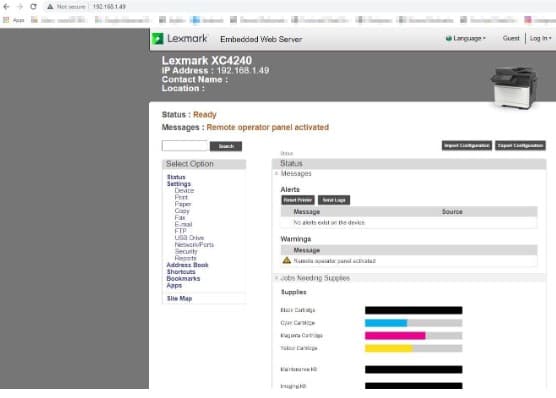
2. Once you have the IP Address, go to your computer and open a web browser (Google Chrome, Edge, Firefox, etc) and type the IP Address in the browser address bar and hit enter.
3. You should pull up a page similar to what is shown in the screenshot below.
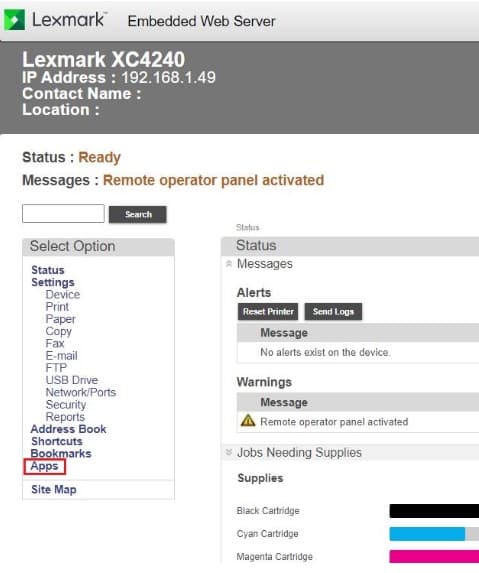
4. Under Select Option, click 'Apps'
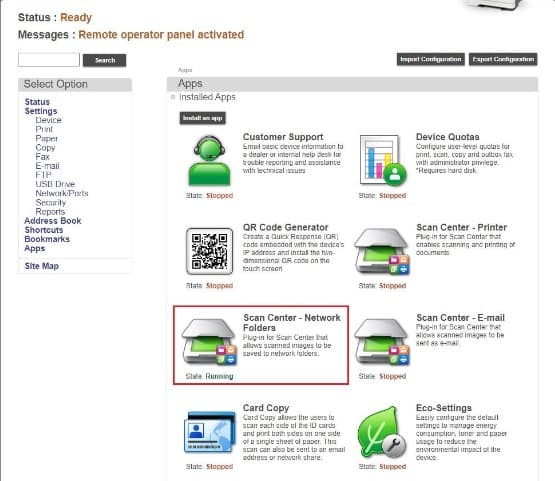
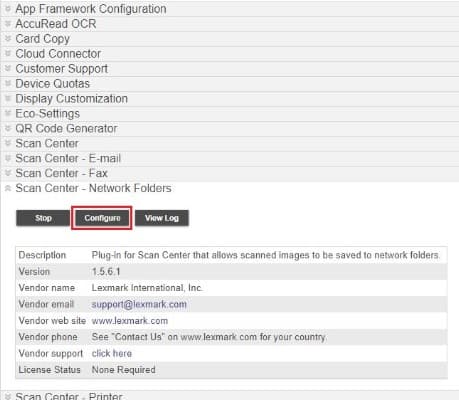
5. Look for 'Scan Center - Network Folders' and click on it.
6. The next page will show you something like what is shown below. Click the 'Configure' button.
7. Under 'Network Folder', look for name that represents the user that you want to delete
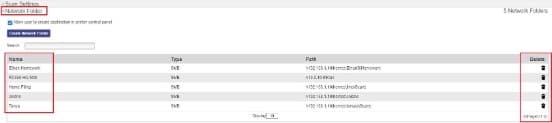
8. Then click'Delete' icon on the right part of the user you want to delete.
9. Click 'Save' button to apply the changes.
1. Go to your printer panel screen and take note of the IP Address located at the top center part. Note: Your Printer's IP Address should be different from what is shown in the screenshot.
2. Once you have the IP Address, go to your computer and open a web browser (Google Chrome, Edge, Firefox, etc) and type the IP Address in the browser address bar and hit enter.
3. You should pull up a page similar to what is shown in the screenshot below.
4. Under Select Option, click 'Apps'
5. Look for 'Scan Center - Network Folders' and click on it.
6. The next page will show you something like what is shown below. Click the 'Configure' button.
7. Under 'Network Folder', look for name that represents the user that you want to delete
8. Then click'Delete' icon on the right part of the user you want to delete.
9. Click 'Save' button to apply the changes.
| Enterprise Model | BSD Model |
|---|---|
| Enterprise Model Multifunction Color Laser Devices | |
| CX510de | XC2132 |
| CX725dhe | XC4150 |
| CX820dtfe | XC6152 |
| CX825dte | XC8155 |
| X748de | XS748de |
| X792de | XS796de |
| X792dte | XS796dte |
| X792dte | XS795dte |
| X792dte | XS798dte |
| X954dhe | XS955dhe |
| Color Laser Printers | |
| CX860dte | XC8160 |
| X925de | XS925de |
| X955dhe | XS955dhe |
| CS725dte | C4150 |
| CS820de | C6160 |
| C748de | CS748de |
| C792de | CS796de |
| Multifunction Mono Laser Devices | |
| MX511de | XM1145 |
| MX611de | XM3150 |
| MX710de | XM5163 |
| MX711dhe | XM5170 |
| MX810de | XM7155 |
| MX810dxe | XM7155x |
| MX811de | XM7163 |
| MX811dxe | XM7163x |
| MX811dtfe | XM7270 |
| MX812de | XM7170 |
| MX812dxe | XM7170x |
| MX910de | XM9145 |
| Monochrome Laser Printers | |
| MX911de | XM9155 |
| MX912dxe | XM9165 |
| MS510de | M1145 |
| MS610de | M3150 |
| MS810de | M5155 |
| MS811de | M5163 |
| MS812de | M5170 |
1. Dial *2 or press 'Envelope' button on your desk phone
2. Enter the voicemail PIN to access your voicemail.
Note: The PIN should be the first four digits of your service street address, if the street address has between 1 and 3 digits you’re your default voice password would be followed by the number 0(s). Example: if you service street address is 22 Main Street your voice mail default password would be 2200, if your street address is 12345 Main Street for voice mail default password would be 1234.
Note:
- We strongly recommend changing your default password to a unique four-digit password that only you would have access to
- You can also check Voicemail via Email, if the 'Voicemail to Email' feature has been enabled on your extension. You can check this out if your voice mails are showing in your email inbox. If it is not showing up or you would like to enable this feature, please let us know at support@futuredigital360.com.
1. Go to Start Menu of your Operating System and select Devices & Printers

2. In the next window, select your printer
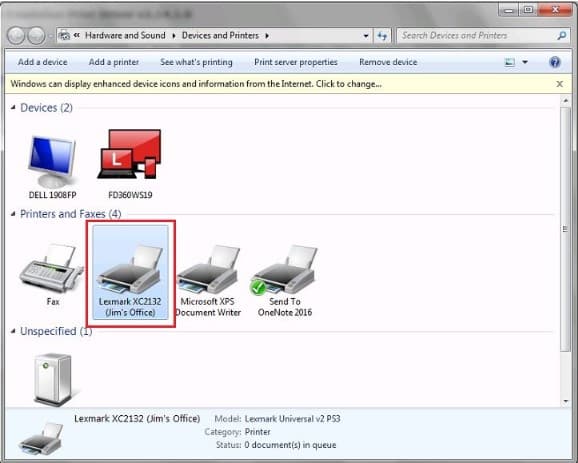
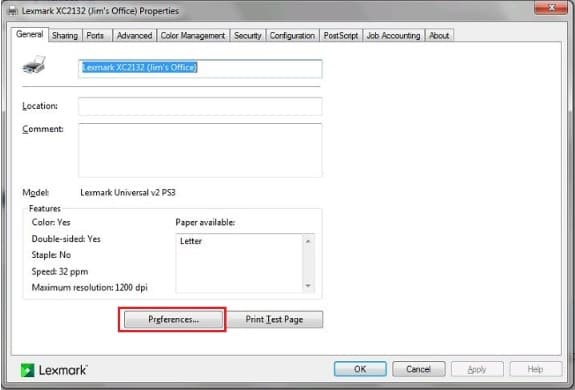
3. Right click on it and select Printer Properties

4. In the next window, click the button Preferences
5. Another window will appear, go to Quality tab
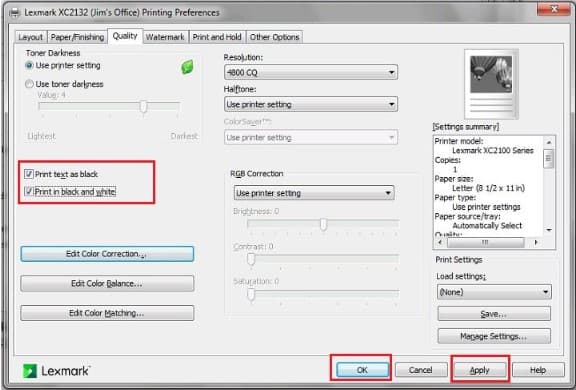
6. Tick the two boxes, Print text as black & Print in Black & White.
7. Click Apply button and then the OK button.
2. In the next window, select your printer
3. Right click on it and select Printer Properties
4. In the next window, click the button Preferences
5. Another window will appear, go to Quality tab
6. Tick the two boxes, Print text as black & Print in Black & White.
7. Click Apply button and then the OK button.
1. Dial *2 or press 'Envelope' button.
2. Enter the voicemail PIN 5656.
3. You have several options to choose from…
Press 0 for Mailbox Options. You will then be given the choice what type of message you want to record.
Press 1 to record your Unavailable Message.
Press 2 to record your Busy Message.
Press 3 to record your name.
Press 4 to record your Temporary Message.
4. Choose the message option that you want to record, press # to finish the record.
Press 1 to accept your message.
Press 2 to listen to your message.
Press 3 to re-record your message if you don't like the previous message.
We always recommend you call your voice messaging to ensure it is working the way you intended. If you have further issue with this or any other item, please call us at 480-809-6334 or email us with requests at support@futuredigital360.com.
How to determine whether your Office 365 account has been compromised
https://support.microsoft.com/en-us/help/2551603/how-to-determine-whether-your-office-365-account-has-been-compromised
How to fix a compromised (hacked) Microsoft Office 365 account
https://blogs.technet.microsoft.com/office365security/how-to-fix-a-compromised-hacked-microsoft-office-365-account/
Setting Up Inbox Rules
https://outlook.office.com/mail/options/mail/rules/inboxRules
Security best practices for Office 365
https://support.office.com/en-us/article/security-best-practices-for-office-365-9295e396-e53d-49b9-ae9b-0b5828cdedc3
Office 365 security roadmap - Top priorities for the first 30 days, 90 days, and beyond
https://docs.microsoft.com/en-us/office365/securitycompliance/security-roadmap
Recover deleted items in a user's mailbox - Admin Help
https://support.office.com/en-us/article/Recover-deleted-items-in-a-user-s-mailbox-Admin-Help-eb15194b-63ec-41b0-8d90-1823d3f558e4?ui=en-US&rs=en-US&ad=US
If you happen to receive suspicious emails, feel free to report them to Microsoft:
Submit spam, non-spam, and phishing scam messages to Microsoft for analysis
https://docs.microsoft.com/en-us/office365/securitycompliance/submit-spam-non-spam-and-phishing-scam-messages-to-microsoft-for-analysis
Set up multi-factor authentication for Office 365 users
https://support.office.com/en-us/article/Set-up-multi-factor-authentication-for-Office-365-users-8f0454b2-f51a-4d9c-bcde-2c48e41621c6
Finding the Multi-Factor Authentication Settings:
https://account.activedirectory.windowsazure.com/UserManagement/MultifactorVerification.aspx
Generate App password:
https://account.activedirectory.windowsazure.com/AppPasswords.aspx
Once you've enable #MFA, you can take advantage of the Attack Simulator Tool:
Attack Simulator: https://protection.office.com/attacksimulator
Attack Simulator (Office 365)
https://support.office.com/en-us/article/attack-simulator-office-365-da5845db-c578-4a41-b2cb-5a09689a551b?ui=en-US&rs=en-US&ad=US&_lrsc=88ff4b1b-eab2-4752-b41c-dc6634f549aa
Introducing Office 365 Attack Simulator
https://youtu.be/5jWGU2VM3SI
1. Login to the PBX
2. Press the CDR and Recordings tab
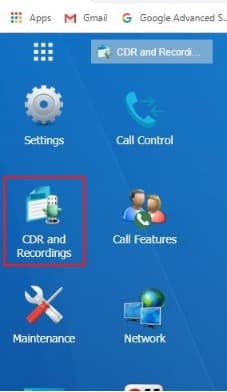
3. Select the Time/Date Range you are searching for.
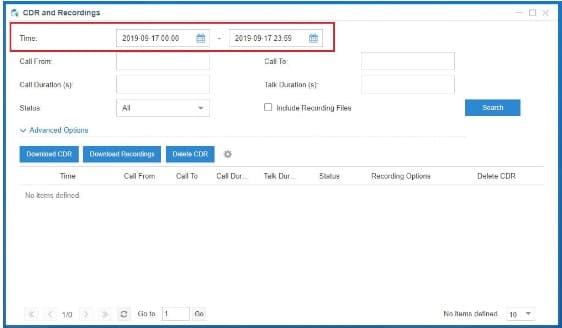
4. Listen or download to listen.
5. If you are searching for a specific number you press the Advanced Options on the left of that window and you will have to check on Number Fuzzy Search to find that specific number.
Note: These instructions are applicable to the Cloud PBX as well, not just the S-series
2. Press the CDR and Recordings tab
3. Select the Time/Date Range you are searching for.
4. Listen or download to listen.
5. If you are searching for a specific number you press the Advanced Options on the left of that window and you will have to check on Number Fuzzy Search to find that specific number.
Note: These instructions are applicable to the Cloud PBX as well, not just the S-series